Level: Beginner.
“Learning TDD with Javascript” is the series of articles where we learn basics of automated testing and test-driven development. While the language of choice for the code examples is Javascript, all described concepts are language-agnostic and are applicable in various technological stacks. In these articles, a reader is expected to do small exercises after each major topic to reinforce that theoretical knowledge with practice. Some of these exercises are practical and will involve coding, or simple writing; others will be food for thought. Also, a reader might want to get their feedback on these exercises, so don’t hesitate to send the results my way: oleksii@tddfellow.com - feedback on the practice is quite important as it helps to improve quicker, when you know what is well and what can be improved and how. Also, don’t hesitate to send any questions and feedback regarding the content of these articles. Your questions, feedback, and your practical results will help authors shape this content better.
Today we are going to learn how to write tests that imitate real user interaction for the whole application. We are going to build a small web application using Vanilla Javascript. Vanilla Javascript is a plain Javascript without any framework or library. Such tests that imitate real user interaction via User Interface (UI) are called End-to-End Tests. These tests are the most simple to write because we only need to think about our application in the same way user does:
- Imitating the user clicking on the button would mean for us to trigger a button click;
- Imitating the user typing text in the input field would mean for us to change input’s value;
- Imitating the user clicking on the link would mean for us to trigger a link click;
- And so on.
We don’t need to think about specific implementation details, such as: which functions and classes do we have in our code and how they interact with each other, is there any interaction with the back-end server or 3rd-party API. Also, we don’t need to be proficient with interaction testing - this is the topic for the future series.
Of course, for that kind of simplicity we are trading something off. In the case of End-to-End tests, they are slower, suffer concurrency, wait, and timeout problems, and are harder to maintain in the long run. We don’t have to worry about that just yet because we want to learn how to write tests in general, and this kind of simplicity is perfect for us in this case.
Such simplicity stems from the fact that End-to-End tests, mostly, are direct translations of user stories (use case scenarios) into the UI manipulation code.
User Story
User stories are scenarios describing an individual feature of the software via user story context, sequences of user interactions and user expectations. User story context is the description of the situation the user and the software system are in at the beginning of the scenario. An example of the system context: “user John is registered in the system with password ‘welcome’.” An example of the user context: “user is at the login page.” User interaction is the description of a particular action user takes inside of the system, usually, doing something within the UI, for example: “User enters email ‘john@example.org’ in the email input field” or “User clicks on the submit button.” Finally, user expectation is the description of what particular information user should receive from the system, for example: “User sees the success message on the page” or “User receives the email with the verification code.”
User stories come in different flavor and formats. It can be a free-form text, describing three parts: context, interactions, and expectations; or it can be in a formal “Given-When-Then” form. “Given” part is the sequence of the user story context descriptions, “When” part is the sequence of the user interaction descriptions, and “Then” part is the sequence of user expectation descriptions. Both forms can be used interchangeably, and some software companies use one or another formal version of the user story format consistently.
Let’s take a look at the example of the free-form user story together with the example of the Given-When-Then user story for the same feature:
| Free-form | Given-When-Then |
|---|---|
| User with email ‘john@example.org’ and password ‘welcome’ exists in the system John enters his email ‘john@example.org’ into the email field and his password ‘welcome’ into the password field on the login page After that John submits the login form Finally, John expects to see their profile page with the indication of him being logged in (name ‘John’ is present on the page) |
Given User with email ‘john@example.org’ and password ‘welcome’ exists And I am at the login page When I enter ‘john@example.org’ in the email field And I enter ‘welcome’ in the password field And I click on the submit button Then I see the profile page And I see my name as the title of the profile page |
As we can see, free-form can be very vague and is very flexible, and formal form is more strict and precise. The free-form on its own doesn’t have much upsides or downsides - it is as good as it is written. On the other hand, the formal form does give us some value and also trades something off for that value. They are generally easy to write and, because they are so specific, are easy to translate to the automated test. On the other hand, they may hamper creativity either while creating the user story or when implementing it.
It is important to mention that these use case scenarios are not full user stories or features. One feature can have multiple scenarios like that - together they are called acceptance criteria. When all such scenarios of the given feature work correctly, the feature is done. There is another vital part of the user story - general description, that should contain the rationale behind the story and the value for the user or any other important actor in the system, such as the stakeholder. Before we write scenarios, we often come up with the rationale like that and it drives us to write a scenario. For example, for the feature above we would have used something like that:
| Free-form | Given-When-Then |
|---|---|
| John needs to authenticate to the system so that he can access his private content | As John, I want to be able to authenticate to the system So that I can access my private content |
Because formal form user stories are more precise, easier to write and simpler to translate to the automated test, we are going to use them to learn End-to-End testing in the context of Test-Driven Development.
Exercises
- Write a scenario for authentication story, when John enters the wrong password.
- Write a user story with rationale and scenarios for the sign-up feature.
- Imagine we are developing an instant messaging application. What do you think would be the next feature after login/sign-up? Write the user story with rationale and scenarios for this feature.
Do you have questions? Or do you want to get quick feedback on how you did the exercises? - mail me: oleksii@tddfellow.com
Setting Up the Project
Now we will be writing a simple web application, using Vanilla Javascript (ECMAScript 5), so that our setup is rather simple. For the testing, we will be using a standalone version of the Jasmine testing framework. Also, we will be writing a single page application (SPA), so that we don’t have to worry about rendering different pages in our tests for now. We are aiming for the following directory structure of our project:
1 2 3 4 5 6 7 8 9 | |
First, create required directories: lib, spec and src. Then download the latest standalone Jasmine release here: https://github.com/jasmine/jasmine/releases (jasmine-standalone-{version}.zip file). At the time of writing, the version is 2.5.2. Unzip that file into your project directory. You should get the following files from it:
./lib/jasmine-2.5.2/directory - contains all the resources required by Jasmine../SpecRunner.html- example entry point to our test suite../src/Player.jsand./src/Song.js- example source files../spec/PlayerSpec.jsand./spec/SpecHelper.js- example automated Jasmine tests.
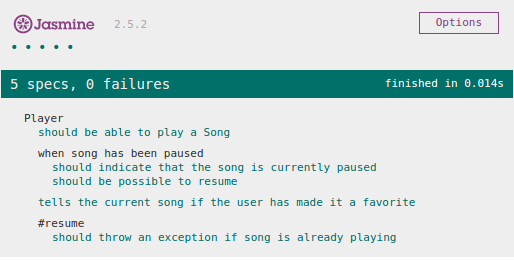
Now, try to open SpecRunner.html in your browser. It should run these example tests, and they should all pass. Here is how it should look like:
Also, create an empty index.html:
1 2 3 4 5 6 7 8 9 10 | |
And now we should have the desired project structure. So how does that Jasmine testing framework works, anyways?
Crash Course into Jasmine
Let’s take a look at the example test file to get the gist of how Jasmine works:
1 2 3 4 5 6 7 8 9 10 11 12 13 14 15 16 17 18 19 20 21 22 23 24 25 26 27 28 29 30 31 32 33 34 35 36 37 38 39 40 41 42 43 44 45 46 47 48 49 50 51 52 53 54 55 56 57 58 59 60 | |
First important concept here is the describe("...", function () { ... }). describe function is used to describe a certain concept or a certain context. For example, describe("Player", ...) means that we are going to define tests for Player class or some other Player concept. Also, describes can be nested to indicate that we are describing some specific context (describe("when a song has been paused", ...)) or sub-concept of current concept, such as the method of currently described class (describe("#resume", ...)). That is a good example, of what the unit test suite might be describing. In the case of End-to-End tests we would like to describe a full feature, so describe("Login Feature", ...) is a good bet. The second argument for the describe is the function that will contain all tests and sub-describes for the described concept. This function is the capturing closure, so defining variables and functions on the outer-level describe will make them available on the inner-level describes and the tests themselves.
Second important concept here is the it("...", function () { ... }). it function is used to create a test for the currently described concept, context or sub-concept. The first argument is the description of what it does, where it is the described concept. For example, given we describe a music player and our context is when the volume is at max, then we might write the test it("is deafening", ...). In the case of End-to-End tests we are describing a feature, so it will refer to our application, or application’s user interface, for example: it("shows user's nickname", ...). The second argument to the it is the function with the test itself. Here we will setup the stage for the test, call our main code and verify that everything happened as we expect.
Finally, the third important concept is the expect(...).to.... That is Jasmine’s form of assertion. That is where we verify that our code worked as we expect it to. As an argument to expect we provide an actual value. The actual value is something that our code has returned as a result of the function or method execution or something that we have read from the UI using UI manipulation code, or something that we have read from some 3rd party service, such as our back-end server, 3rd-party API or database. Essentially, this is the value that we are verifying to be correct. The second part is the Jasmine matcher - the method defined on the object, that is returned from expect(value) call, that allows us to define what we want to assert about that value. The most used one is toEqual(...), which asserts that the value was equal to some expected value.
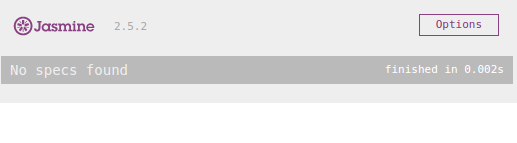
These three concepts should be enough to start writing tests. Don’t worry about everything else that you see in this example file from standalone Jasmine distribution. We will discover some of these concepts as we go. Now, let’s remove src/Player.js, src/Song.js, spec/PlayerSpec.js and spec/SpecHelper.js, and run our test suite - it is enough to reload the page to re-run our test suite. Test run should report that No specs found:
To get the gist of how describe("...", function () { ... }), it("...", function () { ... }) and expect(...).toEqual(...) works, let’s write our first failing test. Also, that will let us see if the testing framework is configured correctly and is capable of showing us the test failure. Let’s create a new file called spec/JasmineWorksSpec.js:
1 2 3 4 5 6 7 | |
And we need to add this test file to the SpecRunner.html:
1 2 3 4 | |
And if we run our test suite, we should see a failure:
1 2 | |
And we ought to make it pass by fixing our incorrect assertion: expect(2 + 2).toEqual(4);. And if we run the test suite again, by reloading the page in the browser, all the test should pass.
Writing our First Simple Tests
Now we can write some real tests to practice usage of describe, it and expect(...).toEqual: let’s create ArithmeticsSpec.js and write some tests for behavior of add function:
1 2 3 4 5 6 7 8 9 10 11 12 13 14 15 16 17 18 19 20 | |
Don’t forget to add the <script src="spec/ArithmeticsSpec.js"></script> to the SpecRunner.html. This test will fail first because Arithmetics module is not defined. We will define it as an empty object. Next failure is because Arithmetics.add is not a function - it is undefined. We will define that function with two arguments inside of the Arithmetics object. Finally, the test will fail, because we expect the result to be seven, but it was undefined. We will make the simplest thing we can do to pass the failing test - return seven. That will make the test pass. The code will be in src/Arithmetics.js, which we include in our SpecRunner.html, and will look like that:
1 2 3 4 5 6 7 | |
That, of course, is not correct implementation, so we need another test to drive out the proper implementation - test with different inputs and a different result. To make it pass we will have to use a + b:
1 2 3 4 5 6 7 8 9 10 11 12 13 14 15 16 17 18 19 20 21 22 23 24 25 26 27 28 | |
Three “A”s: Arrange, Act, and Assert
Have you noticed three comments that I have left in the example tests’ code: ARRANGE, ACT and ASSERT? These are three “A”s of writing a good test. Arrange is the part of the test, where we set up the stage: prepare input data, create objects, load resources, change the state of the system - it is the part where we create the context for our test. Act is the part of the test, where we call our system under the test. In the Arithmetics example it was a function Arithmetics.add(a, b). The system under the test can return some useful value or change its state. To verify that either is correct we, finally, use Assert section of our test - part of the test where we verify the outcome of the call to the system under the test.
The sections ARRANGE, ACT and ASSERT are spelled out in the comments only for the reader’s convenience - usually, real projects don’t have such comments. It is worth noting that for learning and practicing purposes it is a good idea to name these sections explicitly in our tests - this develops a habit of recognizing which part of the test should belong to which section. Also, the formula Act -> Arrange -> Assert makes it easier to come up with the test when we lack deep experience in testing, or with the particular testing framework, or an environment.
Going a bit back to our user story scenarios: have you noticed the connection between “Arrange, Act and Assert” and “Given-When-Then”? Arrange part of the test corresponds to the Given part of the scenario, Act part of the test corresponds to the When part of the scenario, and Assert part of the test corresponds to the Then part of the scenario. Let’s see it on of our previous example scenarios:
| Test Section | Scenario Step |
|---|---|
| ARRANGE | Given User with email ‘john@example.org’ and password ‘welcome’ exists And I am at the login page |
| ACT | When I enter ‘john@example.org’ in the email field And I enter ‘welcome’ in the password field And I click on the submit button |
| ASSERT | Then I see the profile page And I see my name as the title of the profile page |
Exercises
- Write tests and implement functions on
Arithmeticsmodule:subtract,multiplyanddivide. - Inline Arrange, Act and Assert in a one-liner. Can you still recognize implicit Arrange, Act and Assert sections in that one line? Is it more or less readable? Is there a middle ground between two versions? Why would you choose one or the other?
- Classify parts of the free-form story for the user log in from before as Arrange, Act, and Assert. Was it easier, than classifying formal Given-When-Then form? Was it harder? Or maybe the same? How would it be if you never saw Given-When-Then version of that free-form story?
Writing our First End-to-End Test
Now that we know approximately, how to arrange the steps of our scenario into the test, let’s give it a shot. We will start by creating a new test file for our login feature called LoginFeatureSpec.js. Don’t forget to put an appropriate script tag in the SpecRunner.html. We will start by writing the skeleton of our test suite: describe and it inside of it. Next, we will put scenario steps as comments to our test, and we will split them into three sections: Arrange, Act, and Assert. It will look like this:
1 2 3 4 5 6 7 8 9 10 11 12 13 14 15 16 17 18 19 20 | |
Next step would be to change the first Given comment to the function call. We should give a good readable name to that function. One straightforward option would be givenUserExists(email, password). Another good option is addUser({email: email, password: password}). While they are not that different, I prefer addUser for its higher conceptual flexibility - we will likely need that function in some different scenario step in the future. While I prefer that, we should not do that yet, because we might never need the function like that, and givenUserExists will do us more good right now since it resembles the scenario step so much. When we need this flexibility, we’ll perform a refactoring. So for now, let’s create an empty function with that name in a new file spec/FeatureSteps.js and load this file from our SpecRunner.html.
This empty function, on its own, doesn’t do us much good because all our tests will pass. If we continue replacing our steps in comments with such functions, we will end up with one big failure at the Assert section, and we will have to write a lot of code at once to fix that. To drive ourselves to implement the function givenUserExists properly right now, we should write an assertion right after the call. This assertion is not part of Assert section - it is a part of test-driving the functionality of our feature steps. A good assertion here will be to ask our user storage mechanism if such user exists right after we created that user. Also, it would be a good idea to check that user does not exist, before we created it. Also, we will extract variables email and password because we have to repeat them all over the place already. Let’s see how it will look like:
1 2 3 4 5 6 7 8 9 10 11 12 13 14 15 16 17 18 | |
When we run our tests, the breadcrumbs of test failures will drive us to create this basic functionality. First, we will create Users.js with empty Users module and import it from SpecRunner.html. Then, next failure will drive us to add method exists(email, password) on Users module, that will always return false. Next, make function givenUserExists(email, password) call Users.add(email, password), which in turn will make us create a function Users.add(email, password), that will store email-password pair to the list of users in the memory. And, finally, make Users.exists to search for the email-password pair in that in-memory list. And finally, our test will pass. Let’s take a look at how these steps will look in our code:
1 2 3 4 5 6 7 8 9 10 11 12 13 14 15 16 17 18 19 20 21 22 23 24 25 26 27 28 29 30 31 32 33 34 35 36 37 38 39 40 41 42 43 44 45 46 47 48 49 50 51 52 | |
It is funny, how simple Users.exists(email, password) function is. It verifies that we have at least one user. While this is not a correct code, this is good enough for our current test. As we know that this code is not entirely correct, we need to remember to write the test(s) to prove it incorrect, so that we can make it proper with confidence. Since we want first to finish the current test, we should add a to-do list item to write such test. We have two edge cases here that will not work with our implementation: when we have only one user in the system and the credentials we provided do not match and when we have multiple users in the system, and we provide correct credentials for the second one:
1 2 3 4 5 6 7 8 9 10 11 | |
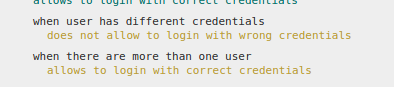
Have you noticed xdescribe? It is a different form of the describe, that allows us to mark the whole context as pending. It won’t run the tests inside, and it will mark them as pending in the test run report. That is the ultimate way to maintain a Test-Driven TODO List. As we test-drive our code, we will find more of these. In the report they look like this:
Let’s finish continue implementing our steps. The comment And I am at the login page transparently becomes a function givenIAmAtTheLoginPage(). As we already have seen, it doesn’t do us any good just to replace the comment with a function call that does nothing - so we should surround it with proper assertions. We know that login page should have some text input for email and another password field for password, and we will need a button to confirm user’s intent to log in. Also, because we are developing a single page application, we would need some container for the currently active page. Let’s say we need these things:
- Initially, we will have only one container with
id="page"and no content. We probably ought to define it in our HTML file. - When we render our login page, we should have:
- email text input field with
id="email", - password input field with
id="password", - and button with
id="do_login".
- email text input field with
Now that we have spelt this out, it is fairly straightforward to write assertions surrounding the givenIAmAtTheLoginPage() call:
1 2 3 4 5 | |
That fails because we don’t have such element in our HTML. We need to create it both in our SpecRunner.html. Also, now it will be important to move all our <script> tags from the <head> to the <body> below the container that we have just created. SpecRunner.html should look this way after that:
1 2 3 4 5 6 7 8 9 10 11 12 13 14 15 16 17 18 19 20 21 22 23 24 25 26 27 28 29 30 | |
Now, our next failure is that givenIAmAtTheLoginPage() function is not defined. We can define it as empty function in our spec/FeatureSteps.js file for now. This will turn our tests green again. We still haven’t made our assertions about the state of the UI after the call to givenIAmAtTheLoginPage - let’s do this now:
1 2 3 | |
That fails with the error Cannot read property tagName of null, which means that we don’t have #email element inside of the #page container. Simplest thing to do would be to add that element to the #page container in our SpecRunner.html. And it won’t work! Because we have an assertion that verifies, that before calling to the givenIAmAtTheLoginPage we do not have anything in the #page container. Now we have to do something useful in the function givenIAmAtTheLoginPage. For example, we can call LoginPage.render(). Which does not exist yet and we will need to create it in the file src/LoginPage.js and load it from our SpecRunner.html. To fix current failure we will need to create a #email element there and append it to our #page container:
1 2 3 4 5 6 7 8 9 10 11 12 13 14 15 | |
That makes the current test failure go away, but we have two more: Expected 'DIV' to equal 'input'. and Expected undefined to equal 'email'.. To make these pass, we would need to change document.createElement(...) call to use input tag name and also we will need to set the input type to email. And as we see, the tag name stored in emailInput.tagName is all-caps, so we will have to fix our assertion also to expect that:
1 2 3 4 5 6 7 8 9 | |
And if we run our tests, they all pass. Great! We should now do the same for our password input field and the login button:
1 2 3 4 5 6 7 8 9 10 11 12 13 14 15 16 17 18 | |
And all tests pass again. Let’s take another look at how our test looks like. It is quite complicated, and it has so much stuff, that is hugely detailed and precise, that it is not possible to see a user story scenario there anymore. One possible solution to that problem is to push the assertions that are related to the feature scenario step to the respective step functions. Now it looks much better. We should use the same concept for all our further steps. After refactoring test code looks like this:
1 2 3 4 5 6 7 8 9 10 11 12 13 14 15 16 17 18 19 20 21 22 23 24 25 26 27 28 29 30 31 32 33 34 35 36 37 38 39 40 41 42 43 44 45 46 | |
Now, let’s follow the same pattern for our Act section. First, we will deal with When I enter ‘john@example.org’ in the email field. This seems to be a call to a function whenIEnterInTheField("#email", email) - we will implement it using Javascript’s APIs. We will do the same for the And I enter ‘welcome’ in the password field, which will use the same function whenIEnterInTheField("#password", password). Finally, we will implement whenIClickOn("#do_login") as a replacement for the comment And I click on the submit button. We will also sprinkle assertions inside of the steps to make sure that we are using the Javascript APIs correctly. The code will look like this:
1 2 3 4 5 6 7 8 9 10 11 12 13 14 15 16 17 18 19 20 21 22 23 24 25 26 27 28 29 30 31 32 33 34 35 36 | |
Now comes the most interesting part of writing this feature test - Assert section. So far, Arrange and Act sections were driving us to create an infrastructure-like code of our application. Now, with Assert section we will have to implement more of our domain logic. Let’s start with the Then I see the profile page. Let’s try to figure our what that could mean:
- We no longer have a login page in our
#pagecontainer. #pagecontainer should somehow indicate that we are on theProfilepage:- could be achieved by adding a sub-container with
id="profile_page"to it.
- could be achieved by adding a sub-container with
- We don’t know much more about what the profile page is. What we do know is:
- the profile page has a name of the user as the title of the page.
Interesting, so far, we didn’t have a concept of the Name of the User. I guess it is time to create one in our arrange block, with all the changes and additional assertions in our feature steps that we have to do:
1 2 3 4 5 6 7 8 9 10 11 12 13 14 15 16 17 18 19 20 21 22 23 24 25 26 27 28 29 30 31 32 | |
And the tests will pass again. And now we have a tested concept of the name in our code. Tested - to the extent required for this test, where we have only one user in the system. Now we can replace the comment Then I see the profile page with the scenario step function call thenISeeTheProfilePage(). The implementation of it will verify that #email, #password and #do_login are no longer present on the page and it will verify that container #page-profile is present and it has #title element in it. Making it pass will require us to add a click event listener to the loginButton in the LoginPage, that will remove contents of the #page container and will call to ProfilePage.render() following the analogy of LoginPage. That drives us to create this module and its render() function. According to our next test failure, this function should create #profile_page sub-container in #page container, so we do that. Finally, we have one last failure, that drives us to create #title element in ProfilePage.render() function. And all tests are green again. Let’s take a look at these changes:
1 2 3 4 5 6 7 8 9 10 11 12 13 14 15 16 17 18 19 20 21 22 23 24 25 26 27 28 29 30 31 32 33 34 35 36 37 38 39 40 41 | |
At last, we can implement the last step - And I see my name as the title of the profile page. A good guess for the step name would be thenISeeTextAt("#title", name). The function will simply select element #title and verify its element.textContent. As expected, it fails with the error Expected '' to equal 'John Smith' and we should fix that within the ProfilePage.render() function by assigning title.textContent to the Users.currentUser().name. This fails because we didn’t define Users.currentUser() function and this is simple to do for our current test - just return the first user. After that all our tests pass. The code will look like this:
1 2 3 4 5 6 7 8 9 10 11 12 13 14 15 16 | |
We have finally, implemented our first feature test. That was quite some work. Also, the functionality of Users module is way incomplete - we need to write more tests to cover different cases. That is how our test code and production code looks like:
1 2 3 4 5 6 7 8 9 10 11 12 13 14 15 16 17 18 19 20 21 22 23 24 25 26 27 28 29 30 31 32 33 34 | |
1 2 3 4 5 6 7 8 9 10 11 12 13 14 15 16 17 18 19 20 21 22 23 24 25 26 27 28 29 30 31 32 33 34 35 36 37 38 39 40 41 42 43 44 45 46 47 48 49 50 51 52 53 54 55 56 57 58 59 60 61 62 63 | |
1 2 3 4 5 6 7 8 9 10 11 12 13 14 15 16 17 18 19 20 21 22 23 24 | |
1 2 3 4 5 6 7 8 9 10 11 12 13 14 15 16 17 18 19 20 21 22 23 24 25 26 27 28 | |
1 2 3 4 5 6 7 8 9 10 11 12 13 | |
Now we could add <div id="page"> to our index.html, and load our src/* scripts after it, and add <script>Users.add("john@example.org", "welcome", "John Smith"); LoginPage.render();</script> at the end to start our application. Enjoy the application that implements one happy path of our feature (we still have quite a few different paths to cover). Also, it might be a good idea to style the application slightly better, than plain inputs and buttons, but we are not going to cover that in these series. This single feature test takes a lot of time to write because it is the first feature test in the empty application. Essentially, it has driven a lot of different architectural decisions, which don’t necessary need to be done the way they were done in this article. Writing a second test for the same feature is much easier and third one, and all consecutive are also easier.
Exercises
- Remove
xprefix from thexdescribetests and implement them using techniques described in this article - write a user story scenario, translate it to the test code and make sure to fix all the test failures one feature step at a time. - Discover more interesting edge cases. Make the tests for them and make them all pass.
- Write sign-up feature’s user story and implement it with feature tests.
Bottom Line
Today we have learned how to write tests for the whole application that imitate real user interaction. We have seen how, test-driving the functionality can help discovering new user story scenarios. Essentially, every time we write simple, but not so correct code that makes our test pass, we need to think what would be the scenario to prove that code wrong and add that scenario on our to-do list, which is represented by pending tests, which have only their descriptions.
In the next article of the series, we will dig deeper on what exactly we did today, what it means to Test-Drive the code, what are the laws, rules, tips and tricks of Test-Driven Development. Next article of the series assumes, that login and sign-up features are fully test-driven and implemented. We will be implementing a brand new feature of our application.
Thanks
Thank you for reading, my dear reader. If you liked it, please share this article on social networks and follow me on twitter: @tdd_fellow.
If you have any questions or feedback for me, don’t hesitate to reach me out on Twitter: @tdd_fellow.